How to Edit AKASO 360 Footage After Shooting: Mobile App Editing Tutorial
Finished shooting with your AKASO 360 and wondering what to do next?
Unlike a traditional action camera, a 360 camera captures the full 360-degree scene around it, not just the view directly in front of the lens. That means you can choose the final viewing angle, field of view, and camera movement after shooting. Explore AKASO 360
This tutorial shows you how to preview your footage, download it to your phone, trim the clip, set viewing angles with keyframes, add creative effects such as Planet, and export a video that is ready to save or share.
Mobile app or Studio: which should you use?
Use the AKASO 360 mobile app if you want a quick phone-based workflow after shooting. It is especially useful if you are new to 360 video because the app includes SmartClip templates and tutorials that can help you create your first edit faster.
Use AKASO 360 Studio if you prefer working on a computer, want a larger screen for reviewing footage, or need to manage files as part of a desktop workflow.
This article focuses on the AKASO 360 mobile app.
Edit in the AKASO 360 mobile app
Step 1: preview your footage
Open the album in the AKASO 360 App, select your footage, and play it once to see if it is worth editing.
Step 2: download the footage to your phone
If the footage is not already saved to your phone, download it first. Once the download is complete, you can keep editing in the AKASO 360 App and export the finished video.

Step 3: check the image settings before reframing
You do not need to adjust every setting. The default options work well for most videos. Before you start choosing angles, check a few settings that can affect the final video.
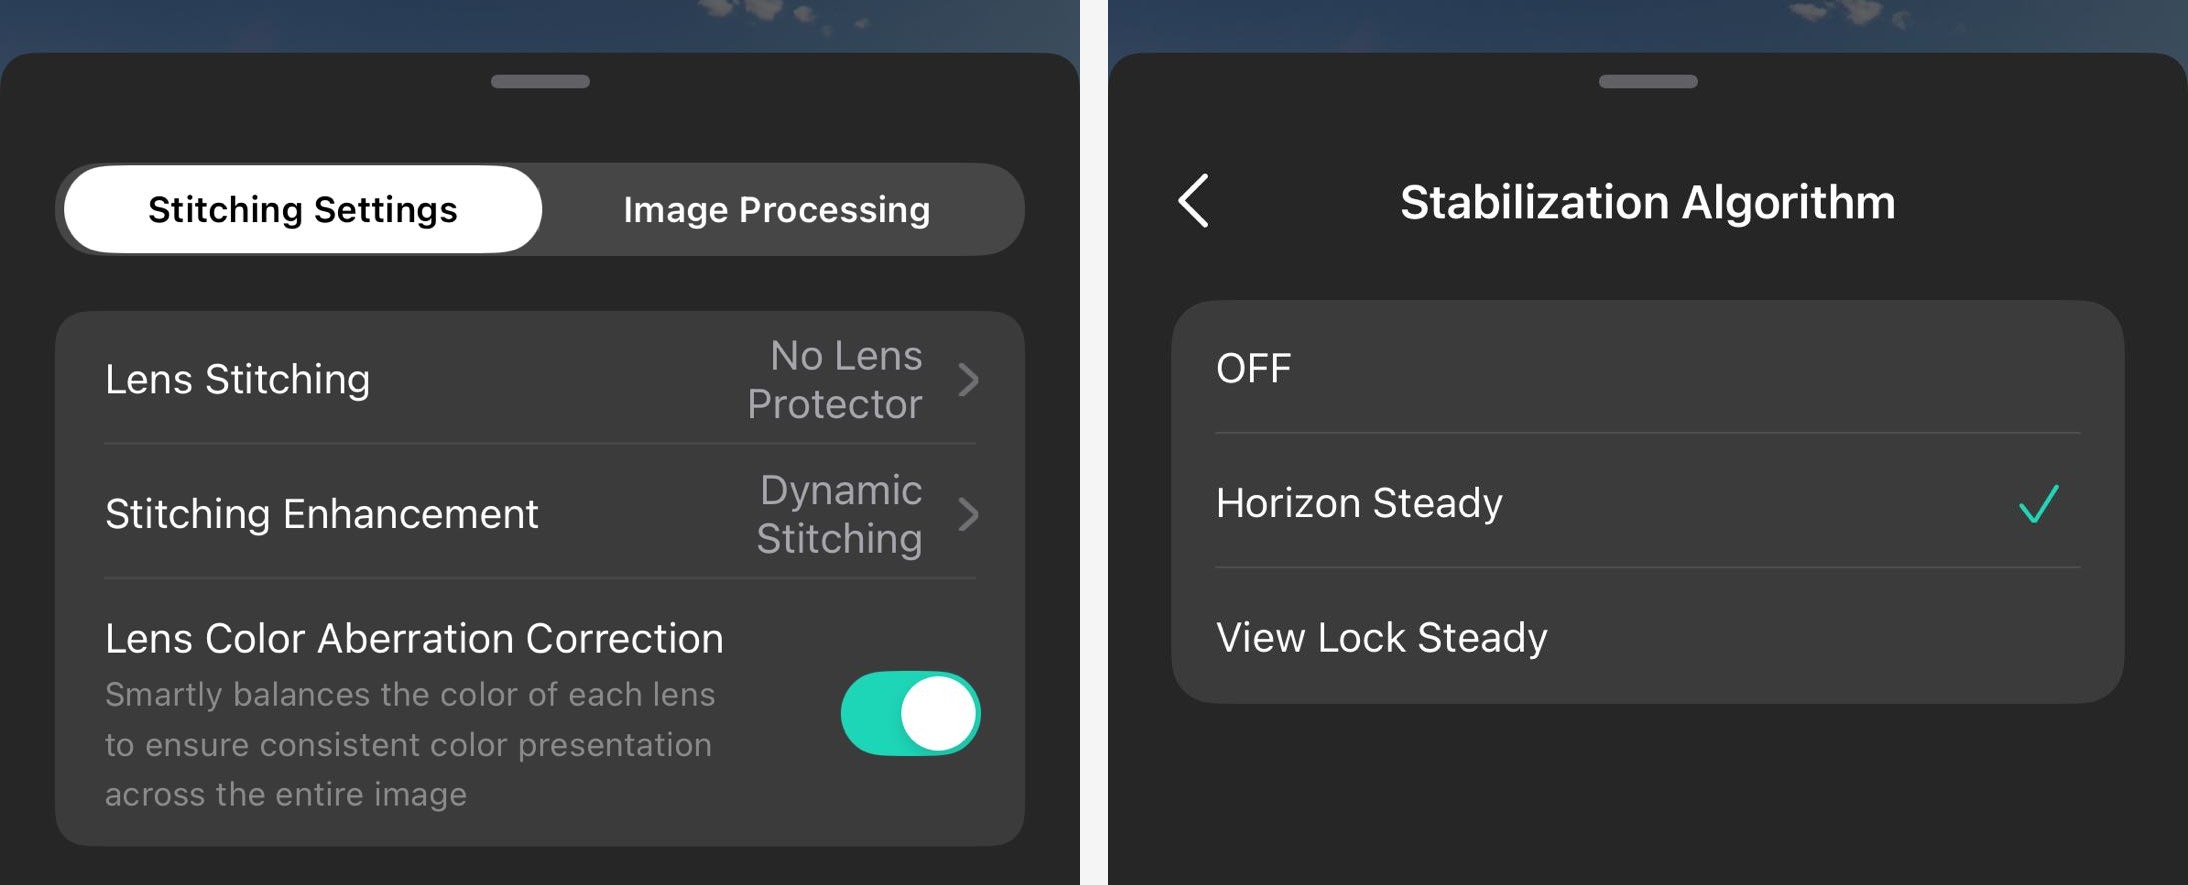
- Stitching Settings: set Lens Stitching to No Lens Protector, then set Stitching Enhancement to Dynamic Stitching.
- Image Processing: for most edits, set Color Space to SDR(Rec.709).
- Logo and watermark: check Nadir logo and Watermark if you want to control whether AKASO branding appears in the exported video.
- Stabilization: choose the Stabilization Algorithm based on how you want the view to behave. Use Horizon Steady when you want the view to follow the camera movement while keeping the horizon level. Use View Lock Steady when you want the view to stay closer to the direction you set with keyframes.
Step 4: choose the editing mode
Tap Edit, then choose Pano or Reframe. Pano keeps the footage in a 360-style view. Reframe lets you choose the view and turn the 360 footage into a standard video.
This tutorial uses Reframe.

Step 5: trim the clip
On the timeline, drag left or right to find the best part of the shot. Pinch the timeline if you need more precise control. Use Trim to remove parts you do not need.

Step 6: adjust the angle, effects, and movement
After trimming, use the tools below to decide what viewers see and how the view moves through the clip.
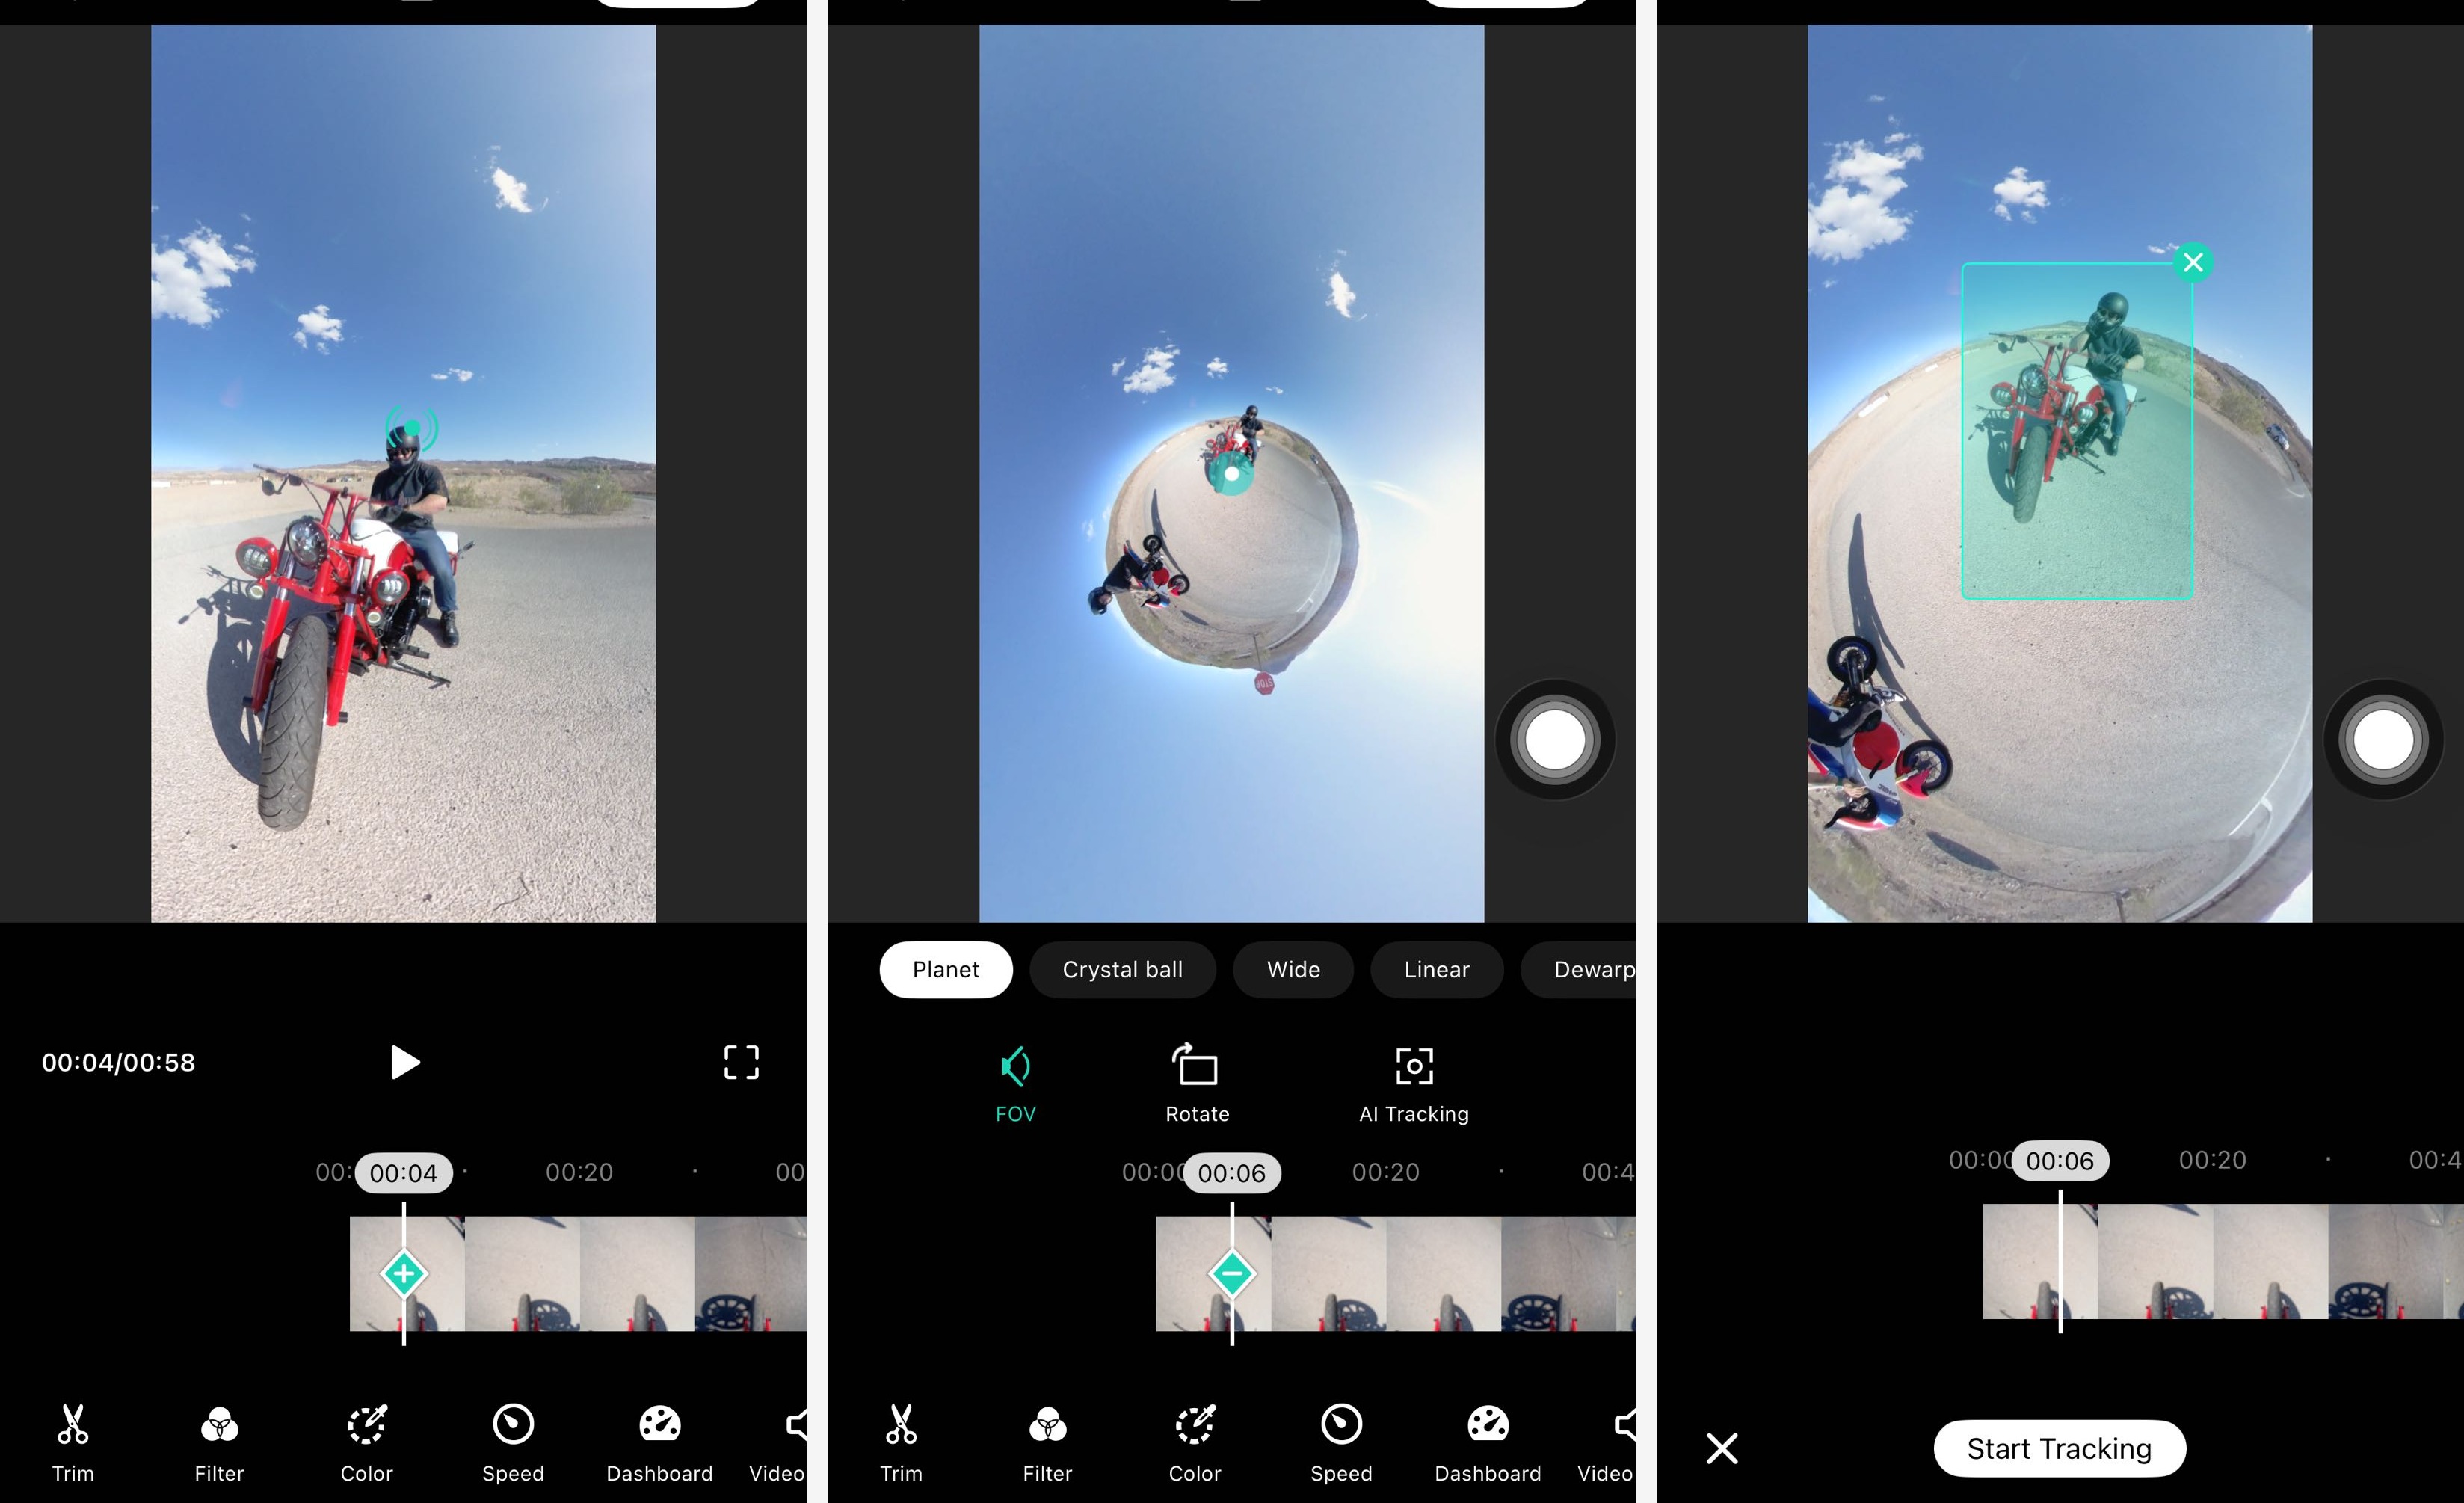
Add a keyframe: save the current view at a specific point on the timeline. This saves the direction, zoom level, FOV effect, and frame angle for that moment.
Add more keyframes: create movement between views. The app moves from one saved view to the next, so the video can start facing the road and then move toward the rider, the sky, or the scene behind you.
Update a keyframe: revise a view you already saved. Select the existing keyframe, adjust the view again, then tap Update Keypoint.
Add a projection effect: use FOV to create looks such as Planet, Crystal ball, Wide, Linear, or Dewarp. These options help turn the same 360 clip into different visual styles.
Adjust the viewing angle: change the direction and angle of the frame. Use the Rotate angle bar to adjust rotation, swipe on the preview screen to change the viewing direction, or pinch with two fingers to zoom in or out.
Use AI Tracking: let the view follow a subject. Tap AI Tracking, select the subject on the screen, then tap Start Tracking.
AI Tracking cannot be used at the same time as projection effects such as Planet. Choose the tool that best fits the shot you want to create.
Step 7: polish the clip
Once the main edit feels right, you can keep the finishing step simple. Add only the tools that match this clip and the video you want to make.
Adjust the look: use Filters for a quick style, or use Color Adjustments for basic color edits.
Adjust the speed: use Speed to slow down or speed up part of the clip.
Adjust the sound: use Video audio to change the original clip volume. Use Music to add background music.
Add motion data: use Dashboard if you want to show motion data in the video.

Step 8: export and save your video
Before exporting, play the video once and check whether the viewing angle, pacing, sound, and any data overlays look right.
- Choose the aspect ratio: use 9:16 for TikTok, Instagram Reels, or YouTube Shorts. Use 16:9 for YouTube videos, website videos, or widescreen playback.
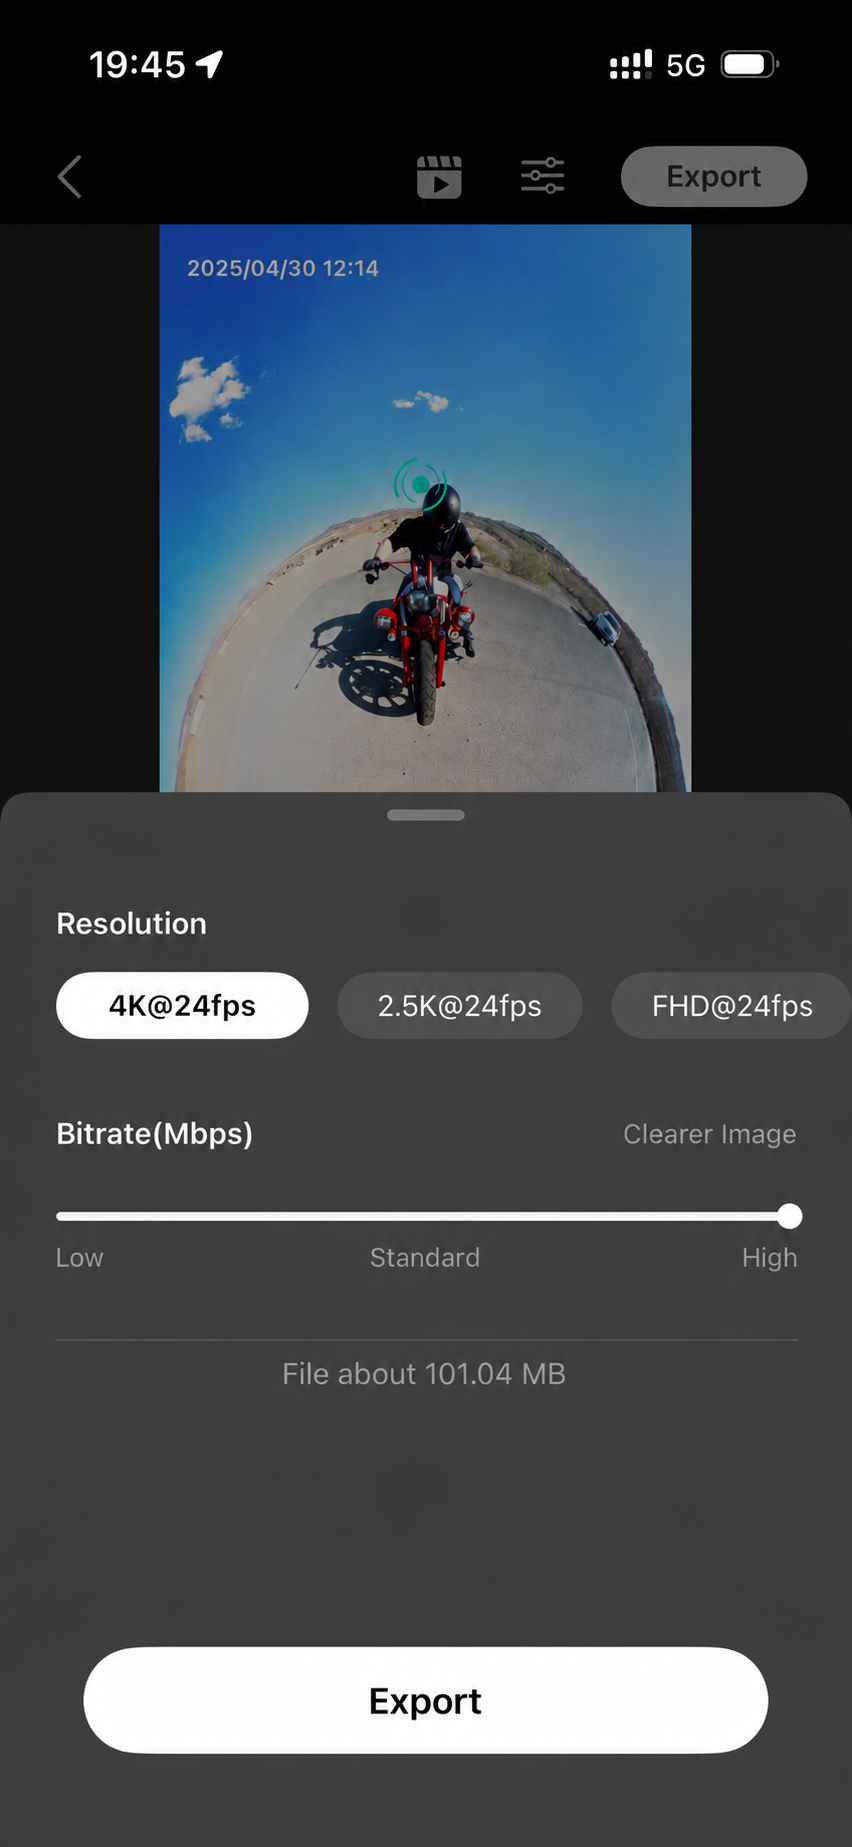
- Set export quality: tap Export, then choose Resolution and Bitrate(Mbps). Higher resolution and bitrate can improve output quality, but they also create a larger file.
- Export the video: check the estimated file size, confirm the export, then tap Open album to view the final result.
Your finished clip is now saved to your phone. Share it when it feels ready, or come back later to try another angle, effect, or export setting.
Additional notes
- App version: This tutorial uses the AKASO 360 mobile app version 2.0.5.
- Compatibility: Make sure your phone meets the AKASO 360 App compatibility requirements before editing.
- Stitching Enhancement: Optical Flow and Dynamic Stitching are the available enhancement options in this setting.
- Lens Color Aberration Correction: This can help make the two lens views look more consistent.
- Nadir logo and Watermark: Nadir logo controls whether the AKASO logo appears in the bottom mounting area of the 360 image. Watermark controls whether an "AKASO 360" watermark appears in the lower-left corner of the exported video.
- Exporting: Keep the AKASO 360 App open and in the foreground during export. Do not switch it to the background until the export is complete.
- Dashboard data: Speed, route, distance, altitude, or slope may require Location Information to be enabled in the AKASO 360 App shooting settings, and the app must stay in the foreground while recording.
- Defringe: Use it when you notice purple fringing in strong light or high-contrast scenes.
Ready to Create Your Own 360 Video?
Capture the full scene with AKASO 360, then reframe, edit, and share your favorite angles right from your phone.
Tips
View All > Motorcycle Camera Angles, Motorcycle Camera Mounts, 360 Camera Motorcycle Filming, Motorcycle Riding Videos
7 Best Motorcycle Camera Angles for 360 Cameras
10/15/2026 Motorcycle Accessories, Motorcycle Camera Mounts, Motorcycle Filming, Motorcycle Riding, 360 Camera Accessories
Best AKASO 360 Accessories for Motorcycle Riding
10/14/2026 AKASO 360 tutorials, mobile video editing, 360 video clarity, troubleshooting, beginner guide
AKASO 360 App Guide: Tutorials, Tips & Troubleshooting
10/14/2026