Just unboxed your AKASO 360 and not sure what to do first?
This quick start walks you through the first setup: getting the camera ready, connecting it to your phone, and recording a short test clip. Then you can turn your footage into a video with a SmartClip template or edit it yourself in the AKASO 360 App.
You can get through the whole process in about 10 minutes, even if you've never used a 360 camera before.
Unbox Your AKASO 360
Start by checking that everything is in the box. The example below shows the Standard Combo. Package contents differ between bundles, so refer to the product listing or packing list for a complete list of what comes with yours:
-AKASO 360 camera x1
-Battery x2
-Protective Pouch x1
-USB-C Cable x1
-Lens Cloth x1
-Quick Start Guide x1

Meet the Camera Before Setup
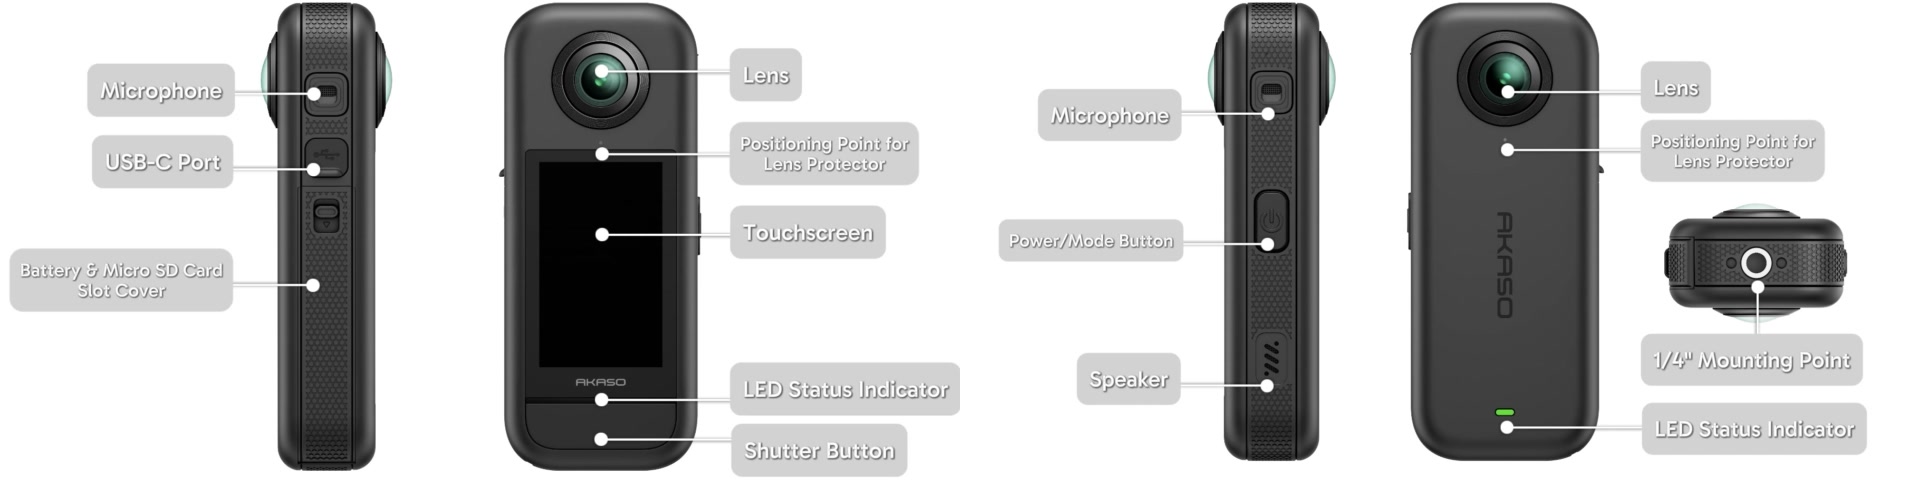
Before you install the battery, turn the camera over in your hands and get familiar with it. The two views below show the controls, ports, and mounting point you'll use during setup and shooting.
Insert the microSD Card and Battery
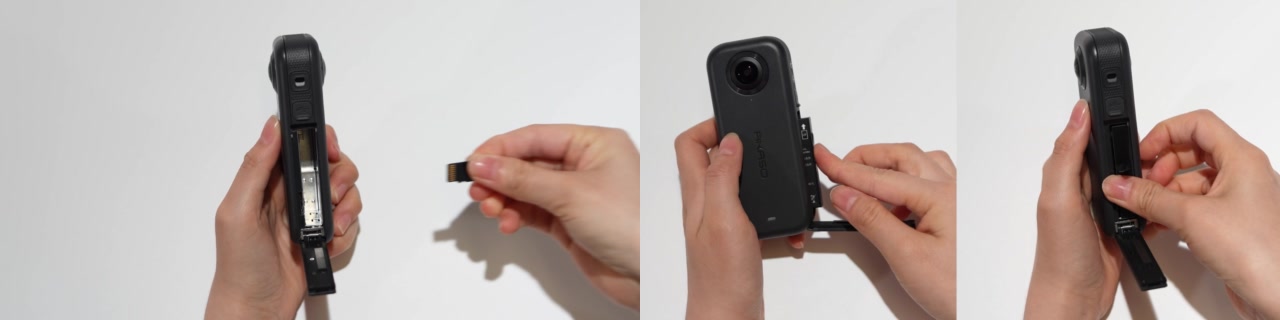
The side cover gives you access to both the microSD card slot and the battery compartment. Use the markings beside each slot to orient the card and battery correctly. For reliable recording, choose a microSD card rated UHS-I V30 / U3 or higher.
Close the side cover, then connect the included USB-C cable. You can let the camera charge while you install the app. The status light stays red during charging and turns off once the battery is full. Before shooting, unplug the cable and close the USB-C cover.
Download the AKASO 360 App and Connect Your Camera
Once the camera has some charge, turn it on with the Power/Mode button. Then connect it to your phone:
1. Install and open the AKASO 360 App.
2. Turn on Camera Hotspot on the camera, then switch on Wi-Fi and Bluetooth on your phone.
3. In the app, tap Device Connection, followed by Connect Camera.
4. Join the camera's Wi-Fi network and approve the permissions the app needs.
The camera is connected when its live view opens in the app. From there, you can preview the shot and start or stop recording from your phone.

Before You Record: Check the Camera Screen and App Preview
You can record directly with the AKASO 360 camera or through the AKASO 360 App. Because the camera and app use different control layouts, we recommend taking a moment to familiarize yourself with the key controls before you start recording.
On the camera screen
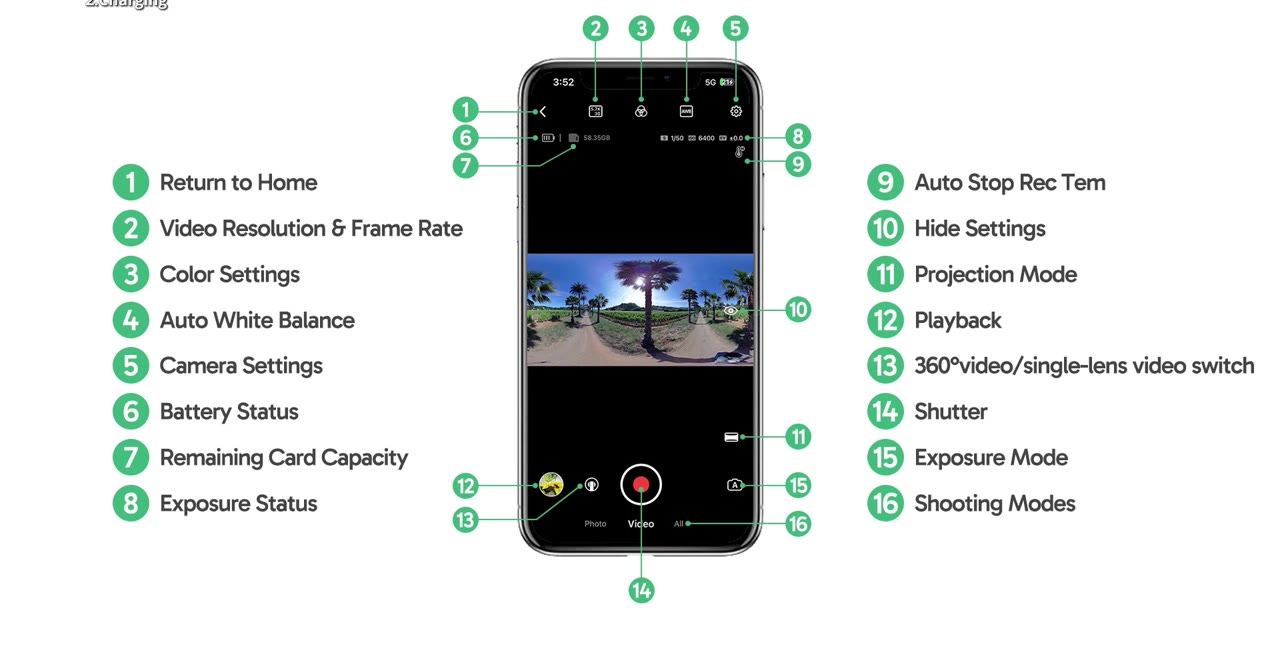
For now, get familiar with the controls you'll use for your first clip. You can come back to the full interface below whenever you need a reminder.
Battery and remaining microSD card capacity tell you whether there's enough power and storage for the clip.
Shooting mode is where you choose Video, Photo, or another available mode. For this test, select Video.
360° or single-lens video changes whether the camera records the full scene around it or uses one lens. Select 360° Video.
Recording specification shows the resolution and frame rate. Start with 5.7K 30FPS for your first 360 clip.
Exposure setting controls how the camera handles the available light. In Auto Exposure Mode, the camera adjusts shutter speed and ISO for you.
Tap the shooting mode icon to choose a mode. Swipe up to change the recording specification, or swipe from right to left to open the exposure settings.
When those settings match, press the Shutter Button to start the test recording.

In the AKASO 360 App preview
Prefer to use your phone? Once the app takes control, the camera screen displays App Control and the live view moves to your phone.
The resolution and frame rate, battery level, and remaining card capacity appear around the preview, so you can check them before recording.
Shooting mode lets you switch between Video, Photo, and the other available modes.
Use the 360° or single-lens video control to switch between a full 360 recording and a single-lens recording.
Open Exposure Mode to check that Auto Exposure Mode is selected.
Tap the on-screen Shutter to start or stop recording. Playback opens the clips stored on the camera.
Whichever control you use, start with the same four settings: Video, 360° Video, 5.7K 30FPS, and Auto Exposure Mode.
Record Your First Test Clip
A simple scene is all you need for this check. Press the camera's Shutter Button or the on-screen Shutter in the app, record for 10 to 20 seconds, and stop the recording.
Now open Album on the camera or Playback in the app. If the clip is there and plays normally, you're ready to make your first video.
Make Your First 360 Video
Once the test clip records and plays back normally, you are ready to make your first video for sharing. Choose SmartClip for a quick template-based edit, or use the AKASO 360 App editing tools for more control.
Tip: For a cleaner 360° stitch, use a selfie stick or another slim mount instead of holding the camera in your hand. Choose an accessory no wider than the camera body.
Quick Option: Use a SmartClip Template
SmartClip handles the edit for you, but it still needs the right kind of shot. Each template has its own shooting tutorial, so choose the effect first and follow the movement shown in that tutorial. Once you've captured the clip, open the matching template in the app to create the edit.
Here's how that works with the Flower Blooming template:
1. Mount AKASO 360 on a 1.2 m or 3 m invisible selfie stick, set the camera to Video at 5.7K 30FPS, and extend the stick.
2. Place the camera among the flowers in an open flower field, then move the selfie stick upward in one slow, smooth motion.
3. Open Album in the AKASO 360 App and download the clip. Go back to Home and choose the Flower Blooming SmartClip.
4. Import the clip and trim it to the best part of the movement. You can add a filter or music before exporting the finished video in 4K.

Creative Option: Edit Freely in the AKASO 360 App
For full control over the framing and camera movement, download the clip from Album and tap Edit.
Choose Pano if you want the finished video to stay 360. Choose Reframe to make a standard video with a view you set yourself. From there, you can trim the clip, adjust the angle, choose a projection, add keyframes, and export.
For a step-by-step walkthrough, see How to Edit AKASO 360 Footage After Shooting: Mobile App Editing Tutorial.
Stuck? Go to the Right Guide
If something isn't working, jump to the guide for that step:
If the app and camera won't connect: What to Check First When the AKASO 360 App Won't Connect to Your Camera
If footage won't import or the preview looks unusual: AKASO 360 Import and Preview Troubleshooting
If the video won't export or the result doesn't look right: AKASO 360 Export Troubleshooting
To check phone or computer compatibility: AKASO 360 App and Studio System Requirements
For help choosing a microSD card: How to Choose the Right microSD Card for AKASO 360
Tips
View All > AKASO 360 Studio, 360 footage transfer, 360 video import, desktop editing, beginner tutorial, file management
3 Ways to Transfer and Import 360 Footage into AKASO 360 Studio
10/22/2026 360 footage import, file transfer, mobile editing, beginner tutorial
3 Ways to Import 360 Footage into the AKASO 360 App
10/21/2026 Motorcycle Camera Angles, Motorcycle Camera Mounts, 360 Camera Motorcycle Filming, Motorcycle Riding Videos
7 Best Motorcycle Camera Angles for 360 Cameras
10/15/2026